
A guide on how to unpack your vintage bicycle
Unpacking your new vintage bike in 11 steps
#1 Unpacking your Vintage Bike
Here at Steel Vintage Bikes we always make sure that your bike is never damaged in transit to you, so we securely package it. The first thing you will have to do when you receive your bike is to remove the packaging.

#2 Greasing the Steerer Tube
Once all the packaging is removed you can start to assemble your bike. The first thing you will need to do is grease the inside of the fork steerer to make sure it does not seize, we recommend using Gipiemme Grease.

#3 Fastening the Handlebars
Next, you will want to line up your handlebar stem with the top tube and slot it into position. You can then fasten the stem bolt with an allen key to secure it into this position, you can find a set of allen keys in our Basic Toolset for Vintage Bikes.

#4 Attaching the Rear Derailleur
Aline the bolt on the rear derailleur up with the hanger on the chainstay and simply tighten it into place by using an allen key.

#5 Clasping the Rear Wheel
Then you will be ready to slot your rear wheel into position. Line your wheel up with the rear dropouts (make sure the rear derailleur is not in the way, if it is gently rotate it towards the back). When the rear axle is firmly in the rear dropouts, secure it by clasping the quick release handle.

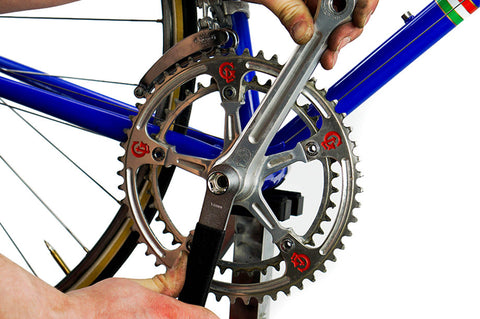
#6 Attaching the Crankset
Aline the crankset up, make sure that the crank arms are at a 180° angle to each other. Then put the bolt into the center of the crankset and tighten it into place by using a fitting nut or a socket wrench, you can find a such a wrench in our Basic Toolset for Vintage Bikes.
Thread the chain around the chainring, cassette, and through both of the derailleurs. Once it is intertwined with all of these components you can; bring both ends of the chain together, connect them with the quick link and then pull the chain tight into opposite directions.

#8 Threading the Pedals
Line the thread of your pedal up with the thread in the crank arm and start to loosely hand tighten the fasten. When this is all alined up you can then tighten it up properly with a spanner, you can find a spanner in our Basic Toolset for Vintage Bikes.
(The left pedal is tightend by threading in a counter-clockwise direction)

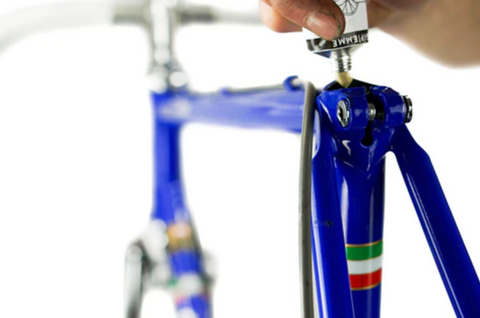
#9 Greasing the Seat Tube
You will need to grease the seat tube to make sure it does not scratch the seatpost, we again recommend using Gipiemme Grease. This also ensures that the seatpost will not seize up in the future.
#10 Attaching the Seatpost
Next, you will want to line up your seatpost with the seat tube and slot it into position and adjust it to your desired height. You can then tighten the bolt with an allen key to secure it into this position, you can find a set of allen keys in our Basic Toolset for Vintage Bikes.

#11 Clasping the Front Wheel
Lastly, you will need to slot your front wheel into position. Line your wheel up with the front dropouts and then when the rear axle is firmly in the front dropouts, secure it by clasping the quick release handle.


